Showing posts with label Spray Paint. Show all posts

Monday, July 9, 2012

Privacy Screen

You know those horridly expensive privacy screens that are flimsy, and might fall at the passing of a train in the next city? Well, save your monies on this one. Here's a few ideas to create your very own!

Yes, I found this idea, yet again, on Pinterest. I just modified mine a bit.
Here is the original post I got the idea from:

I went to my local Habitat for Humanity Resale store to browse around. I couldn't find any small narrow closet doors like I was looking for, so I decided to look at the store through my creative goggles. I found the Bi-fold closet doors! Hinges already attached (I really didn't feel like doing handyman skills). So, I thought I would start with a bi-fold for the space I was needing, and if I decided to try a tri-fold, I could go back and get another panel.

This is what I needed to cover up. Eye-sore, I know. I hate walking into this from the garage every time I come home.


After I pulled all the bi-fold's down off the shelf to inspect them, I settled on this one. 
For...wait for it... $10!!!!

And, let the cleaning begin! I washed this puppy down well. Dust and spider webs galore.


After 2 cans of white spray paint, I had a transformed screen!


I was so excited to put it in this space! 

No more eye-sore, that's for sure. And all for around $18! Can't beat that price.


For this small space, it is really turning into a cozy part of own home!

creative. endeavor= complete

Onward.


Monday, April 2, 2012

Headboard

One of my goals has been to make a headboard. I started simple, and I may upgrade later.
I started with a canvas frame with the dimensions that I wanted, some fabric, and my staple gun. And, I got busy!


I stapled one end all the way down the length of the frame. Then I started on the other side in the middle, stretching the fabric as I moved towards the end.


 After I was done, this is what they looked like on the back.

And from the front:

Then I nailed some frame brackets to the back so I could hang it on the wall.
Not too bad for a $15 head board, hu?? 


creative. endeavor =  completed

Onward.

Accent Chairs


Since I got a new kitchen table  I decided to up-cycle my old table and chairs. So, here are the chairs before:


And after a coat of black spray paint. One, $4 yard of fabric. Quilting batting. and a piece of foam. This is what I got for a few accent chairs. It's always nice to have a few extra spots to sit, right?

I love these simple upgrades!

creative. endeavor = completed 

Onward.


Simple Art

As I was planning out my gallery wall, I decided I needed to make a few extra additions to help keep the balance. I did a quick surf through my sidekick, Pintrest. And, I liked this:


So I decided to create my own!
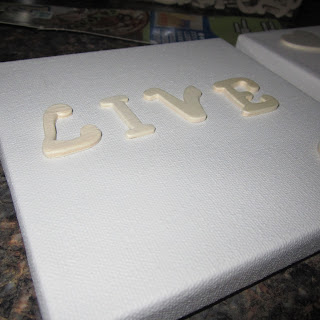
I got some square canvas from Hobby Lobby and some wood letters.
I used a hot glue gun to keep the wood in place. Make sure to draw a light straight line, in pencil, to line up the letters. 


Then, I took them to the garage to spay paint them silver to give my gallery wall some balance, and POP.
Whatta think?


creative. endeavor = completed

Onward.


Tuesday, March 27, 2012

Old Cupboard into Serving Tray

Yes, yet another Pintrest find. I have been wanting to re-due my master bedroom now that my daughter's room is almost complete. When I ran across this on www.craftynest.com I knew I had to make these for my side tables.
Here is their example:

An old cupboard, made into a serving tray. Clever, hu??
So, I took a little trip to the Habitat for Humanities Re-sell store, and went crazy in there! I have so many ideas for projects.

This is how they started. Can you read the price tag? $3.00!!!!!


Sanded and spray painted them with three coats of white spray paint. ( I should buy stock in this stuff. It's wonderful.)


Found some hardware at Hobby Lobby that was 50% off. I think I paid $2.00 for each handle.


 Nailed the handles to the tray.


I tried two different inlays for the tray. This one is a piece of scrapbook paper cut to size and fits perfectly in the center. I like this idea because then you can change the inlay whenever you want to give it a new look.


For the second one, I decided to try some stencil work. I used this stencil, and made my own design to fit the space in the tray.

 I used a combination of these two paints to give it a sheer look.


 It is more sheer than what the picture shows. But, I love how both of them turned out. These are going to be a great addition to my side tables!


Side-by-side. They each will go on a white table like this one. Stay classy.


creative. endeavor= completed

Onward.

Saturday, March 24, 2012

Tiny Table for Two

Since my daughter wanted the gold mirror at her play table, I had to make it match, right? Her table was ready for a new coat of paint anyway. 
So, here is her table before:


To go with Mommy's theme, right? Too cute!


creative.endeavor= completed

Onward.


Sunburst Mirror

This next project was inspired by THIS blogger. So I decided to try my own version of it.

I started with a #3.50 candle base and $.69, 100 count BBQ skewers. 


Then I grabbed my glue gun. I made a circle template in pencil on the back so I had a guide to go by.


Then, a little metallic gold spray paint andddd here we have it! I added a small display mirror to the center that I had laying around from a past project.


My daughter Lilly said she wanted me to hang it in her 'play area' after I paint her table and chairs black and red (yep, that's my daughter!). 

creative.endeavor= completed

Onward.

Friday, March 23, 2012

Rubber Band Tea Light

I found my inspiration for this next piece on Pintrest. So here is their example:

This is what I started with:

Here are a few tips: make sure you start in the middle with the rubber bands and work your way to the ends. Otherwise, they will get twisted when you try to put them on. After the paint has dried, take the bands off OVER the sink, or you will have a huge snowy like mess. And who wants to get the sweeper out?? Not this lady!


And, the finished product!


Not too bad?? Next time I will use more rubber bands I think. But, for a first try I like it! I am going to make a few more for the other side table.

creative.endeavor= completed 

Onward.


Weekend Projects

Well, I have a few projects for this weekend. Here are some 'before' photos as well as photos of inspiration. I will create a post about each one as they are completed. 

So, to start.
My doors do no have trim around them, so I thought I would bring some depth into the hallway and paint them on! Also, the doors are too plain for my liking, so I am going to paint a stripe down the whole hallway. Pictures to follow.

Next, I'm going to create this Pintrest find:
Rubber bands around a vase, and spay paint! Clever, hu??
My own pictures to follow.

Happy crafting! 

Onward.