Thursday, June 7, 2012

One Brick, Two Brick, Three Brick, Four...

We've been having some great weather lately, so many of my projects (that take forever) have been outside. I took the opportunity to try and finish my brick walkway.
When I first moved in, I couldn't stand that the bricks were all overgrown with grass and weeds. I started to pull up the grass and found that this was going to be a bigger job than I had first anticipated. You know the old saying, "do it right the first time." ? Well, I decided to re-lay every... single... brick... You would have too if you came upon the mess that I did! This is how it started. 

Beware: The following photo may cause you feelings of compassion and pity for the persons involved in taking on such tasks. And, they accept.

This is only about HALF of the walk way. The other half leads to the driveway.

This is the start of the drive way...see what a mess it is???

I spoke with my neighbor (as he looked at me with crazy eyes at the task I was about to embark on) and he said that he hasn't seen the top of these bricks in about 16 years! 16 years people!! I am doing a service by liberating these bricks to work to their full potential!

You can see the other half of the walkway in this picture, leading up to the driveway. I've made progress, right??!!

After hours upon hours of pulling up grass, digging out the bricks, leveling the dirt, laying sand, and RE-laying the bricks in a different pattern...it is almost complete.


I just need to lay a sand/mortar mix on top of these bricks and they should be nice and sturdy for walking! Only about 4 or 5 more feet to go. 

UPDATE:
Here it is complete! I'm so glad this project is over. Now I get to start on the brick patio.


creative. endeavor=  complete

Onward.

Creative Endeavors goes- Outside!

I took my endeavors outdoors this summer to do some landscaping work. Lucky for me previous owners didn't do any landscaping, so all I had to do was clear out grass and not cut down trees! There is a walkway from my back door leading to the back yard. I just got sick of seeing grass. I want to be welcomed into the backyard with whimsical plants! So, that is exactly what I started to create. Here is what the landscaping (or lack there of) looked like before:

Plain as you can get! I killed off the grass first and then cut it into sections to be able to roll the grass out of the space. I thought about renting a sod cutter, but it was just too big to be able to maneuver in this small space. So, I did it all by hand, and my muscles love me for it!

Anddddd, after! What a difference some hard work will make! I got some day lilies at a local greenhouse for $5 a piece, and in a few years they should multiply so I can move them around to other places in the yard. Not too bad for my first try at landscaping! Boy was it hard work. Very much worth it in the end.


creative.  (outdoor) endeavor= compete

Onward.


Monday, April 9, 2012

Craig's List Find

I have had my kitchen table and chairs since college, so I my thought was to buy brand new with my tax check this year. I allowed myself some money...buttttttttt as I was searching through CL, I found THIS:


They were asking $100 for it, but I negotiated it down to $80. Never EVER pay the asking price without asking for a lower price first. Use those negotiating skills!!
Up close there are a few scratches on the table top, so I'm going to sand it down and dark stain it.

This was a STEAL; to say the least. And now I have extra tax money to put into savings..errrr spend at Lowes (we all know that is where my money is going to untimely end up anyway). What a great addition to our home!

creative. endeavor= complete

Onward.

Monday, April 2, 2012

Gallery Wall

There are so many creative gallery walls out there! I thought I would create my own (on the largest wall I have in my house).
This is what the wall looked like before:

I started by making a center piece for the wall. A monogram 'C' (with the left over fabric from my headboard).

Got my hot glue gun out and created this:


I placed the 'C' on the wall. ooooo so lonely!!!


And here is a little picture hanging tip I read about. Use this nail to put in the hook on the back of your picture. Place the picture on the wall where you want it to hang, and give it a little tap. It will create a hole for you to place your nail in. Picture Perfect Placement!


I placed on my frames on the floor first so I could create a good balance of small to large frames.
This is how it started.
I made some marks on the wall creating a horizontal 5" line to line up the bottom of my frames. Start a hangin'! 


Slowly but surly, comin' along.


And, here she is. Complete! I added a few of my daughter's art projects to create some interest as well as a few silver canvas pieces I made.


creative. endeavor = completed 

Onward.

Headboard

One of my goals has been to make a headboard. I started simple, and I may upgrade later.
I started with a canvas frame with the dimensions that I wanted, some fabric, and my staple gun. And, I got busy!


I stapled one end all the way down the length of the frame. Then I started on the other side in the middle, stretching the fabric as I moved towards the end.


 After I was done, this is what they looked like on the back.

And from the front:

Then I nailed some frame brackets to the back so I could hang it on the wall.
Not too bad for a $15 head board, hu?? 


creative. endeavor =  completed

Onward.

Accent Chairs


Since I got a new kitchen table  I decided to up-cycle my old table and chairs. So, here are the chairs before:


And after a coat of black spray paint. One, $4 yard of fabric. Quilting batting. and a piece of foam. This is what I got for a few accent chairs. It's always nice to have a few extra spots to sit, right?

I love these simple upgrades!

creative. endeavor = completed 

Onward.


Simple Art

As I was planning out my gallery wall, I decided I needed to make a few extra additions to help keep the balance. I did a quick surf through my sidekick, Pintrest. And, I liked this:


So I decided to create my own!
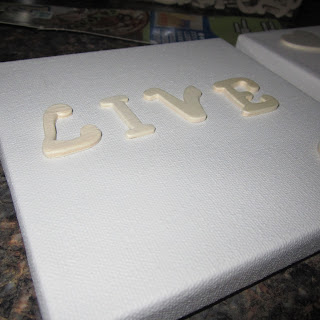
I got some square canvas from Hobby Lobby and some wood letters.
I used a hot glue gun to keep the wood in place. Make sure to draw a light straight line, in pencil, to line up the letters. 


Then, I took them to the garage to spay paint them silver to give my gallery wall some balance, and POP.
Whatta think?


creative. endeavor = completed

Onward.