Thursday, July 26, 2012

A New Endeavor

I am so extremely excited to begin this new adventure for my family; AND to be able to share it all with you! 

I have many passions in life. DIY being one of them; and the main reasons I began this blog. After reflecting on my daily routine, I've come to the conclusion that I have not satisfied the ten-year-old me by working the 8-5 grind. When I answered the question "what do you want to be when you grow up", I would have never guessed I would still be aspiring to it at age twenty-seven. So, what do I want to be when I grow up? A business owner. A life coach. A nutritionist and fitness guru. A stay-at-home mom. A volunteer for local organizations, and for my daughter's school functions.

Well- I think I've come to the cross-roads of 'growing up'. I've discovered an amazing company that will not only provide a clean home and maintain a healthy lifestyle; but provide the income needed to allow me to stay at home with my daughter. I'm a business owner!!!! Not only that, I am helping those around me aspire to THEIR dreams, and THEIR passions. I want to be a passionate leader. Informing people that they too can make all their dreams come true with a little elbow grease.

I'm am determined beyond every doubt in my mind that starting my own business with Shaklee is the best solution to my financial situation, the best solution to fulfill my passion for helping others, and the best solution to create opportunity for my daughter.


Take a minute to watch this inspiring video of Nathan and Jenni Oates' 'Shaklee Story'.

 Shaklee Videos: Jenni & Nathan Oates

With a company like Shaklee that promotes 'doing good' not only for individuals, but for the environment, I couldn't turn this opportunity away. Thus, let us embark together on this journey of health and wealth!

The corporate website is www.Shaklee.com
I will post my website as soon as it is up and running.
Any further questions- or comments on the products/ company please feel free to email me at:
janeecarlile@gmail.com

http://JCarlile.myshaklee.com

I would love to talk to you about YOUR passions!!! Email me to set up a time to Skype, chat, or conference call.


Monday, July 9, 2012

Privacy Screen

You know those horridly expensive privacy screens that are flimsy, and might fall at the passing of a train in the next city? Well, save your monies on this one. Here's a few ideas to create your very own!

Yes, I found this idea, yet again, on Pinterest. I just modified mine a bit.
Here is the original post I got the idea from:

I went to my local Habitat for Humanity Resale store to browse around. I couldn't find any small narrow closet doors like I was looking for, so I decided to look at the store through my creative goggles. I found the Bi-fold closet doors! Hinges already attached (I really didn't feel like doing handyman skills). So, I thought I would start with a bi-fold for the space I was needing, and if I decided to try a tri-fold, I could go back and get another panel.

This is what I needed to cover up. Eye-sore, I know. I hate walking into this from the garage every time I come home.


After I pulled all the bi-fold's down off the shelf to inspect them, I settled on this one. 
For...wait for it... $10!!!!

And, let the cleaning begin! I washed this puppy down well. Dust and spider webs galore.


After 2 cans of white spray paint, I had a transformed screen!


I was so excited to put it in this space! 

No more eye-sore, that's for sure. And all for around $18! Can't beat that price.


For this small space, it is really turning into a cozy part of own home!

creative. endeavor= complete

Onward.


Natural Laundry Soap

During my daily pinning on Pinterest, I ran across a homemade laundry soap recipe. I just HAVE to share how easy it is to make. How inexpensive it is. And, how CLEAN it gets your cloths. With just three ingredients, you too can make your own.

I started with Arm & Hammer Super Washing Soda, Borax, and a bar of soap.

Grate your soap (you can use Ivory or a body washing soap as well) with a cheese grater into a bowl. Put one cup of A&H, and one cup of Borax into the bowl. Use a wooden spoon to stir together until the ingredients are thoroughly mixed.

Use 1 Tablespoon of the mixture for each load of laundry (more if you wish). Also, safe for HE washers. Safe for septic, safe for your family, and safe for the environment! What else could you ask for!?!

I put mine in a cute jar above my washer and dryer. I can't tell you how excited I am to wash with this, AND how cost effective it is. I will never by 'laundry soap' again.


Happy Washing!

creative. endeavor = complete

Onward.

Monday, June 18, 2012

Brick Patio Tutorial

Since CE (creative endeavors) has been relocated outdoors for the summer, I decided to post about a DIY brick patio. You can do this as a weekend project, no problem. I took the project a bit further, and will be adding more on this week. I at least wanted to show you what I've been able to do!
So, I started researching patio templates and designs and I came across this one on Sunset.com.
The hardest part about my project was pulling the bricks UP from the space. Laying them was the fun part, and didn't take as long as I thought it would.
Here is my patio before:
Yes, I pulled every. single. one. of the bricks out of the space and made a few piles.

Then I prepped the soil:
Made sure it was somewhat level, and pulled out all the weeds.

Lay and level sand in the area of where you want to place bricks. I found where I wanted 'center' to be and made a circular template using some ribbon.  I marked off 5 1/2 inches on the ribbon to give me a diameter of 11. Tie the ribbon to a 'center' (I used a screw driver), and use your finger as a marker to draw in the sand so you know where to place the ends of the bricks.

And...begin to lay the bricks in the design/ pattern you want!

After about 20 or 30 minutes this was my outcome: I put some river rock in the center. You could use the center for a bird bath, plant, or fire pit to name a few.

At this point, the template pattern ended on Sunset.com, but I'm going to keep going to fill the whole space. I purchased some bamboo and grass plants to fill in around the bricks to give it a whimsical garden feel. I can't wait to complete it! To finish off the bricks, I will be laying sand in between, then using a mortar-sand mix to interlock the bricks since it will be a high traffic area.

You could easily complete this in a weekend if you wanted a small two person patio somewhere in your yard. This garden is going to take a few weekends to complete, so stay tuned.

UPDATE
Patio is complete!!


I can't wait to drink my coffee out there!!!

creative. endeavor= complete

Onward.


Monday, June 11, 2012

Mail Call!

Most of you can relate to this: Pintrest will be the death of me!
For my next project, I got the idea from this photo:

Isn't this the perfect idea to put outside your little one's door? You can write them notes, put some cookies in there, a small gift. The ideas are endless!
So I wanted to make one for Lilly. I found this mailbox on sale for $7 at Menards, but I'm sure you can find one at a local hardware store, or maybe even Goodwill.

I painted it a flat black, and used a tooth brush to splatter some pink paint on it for her. Then I used scrapbook letters to put her name on the outside.

And, then hang on the wall! I wrote her a little note and she just loves to put things in there to 'send' to me too.


creative. endeavor= complete

Onward.


Thursday, June 7, 2012

One Brick, Two Brick, Three Brick, Four...

We've been having some great weather lately, so many of my projects (that take forever) have been outside. I took the opportunity to try and finish my brick walkway.
When I first moved in, I couldn't stand that the bricks were all overgrown with grass and weeds. I started to pull up the grass and found that this was going to be a bigger job than I had first anticipated. You know the old saying, "do it right the first time." ? Well, I decided to re-lay every... single... brick... You would have too if you came upon the mess that I did! This is how it started. 

Beware: The following photo may cause you feelings of compassion and pity for the persons involved in taking on such tasks. And, they accept.

This is only about HALF of the walk way. The other half leads to the driveway.

This is the start of the drive way...see what a mess it is???

I spoke with my neighbor (as he looked at me with crazy eyes at the task I was about to embark on) and he said that he hasn't seen the top of these bricks in about 16 years! 16 years people!! I am doing a service by liberating these bricks to work to their full potential!

You can see the other half of the walkway in this picture, leading up to the driveway. I've made progress, right??!!

After hours upon hours of pulling up grass, digging out the bricks, leveling the dirt, laying sand, and RE-laying the bricks in a different pattern...it is almost complete.


I just need to lay a sand/mortar mix on top of these bricks and they should be nice and sturdy for walking! Only about 4 or 5 more feet to go. 

UPDATE:
Here it is complete! I'm so glad this project is over. Now I get to start on the brick patio.


creative. endeavor=  complete

Onward.

Creative Endeavors goes- Outside!

I took my endeavors outdoors this summer to do some landscaping work. Lucky for me previous owners didn't do any landscaping, so all I had to do was clear out grass and not cut down trees! There is a walkway from my back door leading to the back yard. I just got sick of seeing grass. I want to be welcomed into the backyard with whimsical plants! So, that is exactly what I started to create. Here is what the landscaping (or lack there of) looked like before:

Plain as you can get! I killed off the grass first and then cut it into sections to be able to roll the grass out of the space. I thought about renting a sod cutter, but it was just too big to be able to maneuver in this small space. So, I did it all by hand, and my muscles love me for it!

Anddddd, after! What a difference some hard work will make! I got some day lilies at a local greenhouse for $5 a piece, and in a few years they should multiply so I can move them around to other places in the yard. Not too bad for my first try at landscaping! Boy was it hard work. Very much worth it in the end.


creative.  (outdoor) endeavor= compete

Onward.


Monday, April 9, 2012

Craig's List Find

I have had my kitchen table and chairs since college, so I my thought was to buy brand new with my tax check this year. I allowed myself some money...buttttttttt as I was searching through CL, I found THIS:


They were asking $100 for it, but I negotiated it down to $80. Never EVER pay the asking price without asking for a lower price first. Use those negotiating skills!!
Up close there are a few scratches on the table top, so I'm going to sand it down and dark stain it.

This was a STEAL; to say the least. And now I have extra tax money to put into savings..errrr spend at Lowes (we all know that is where my money is going to untimely end up anyway). What a great addition to our home!

creative. endeavor= complete

Onward.

Monday, April 2, 2012

Gallery Wall

There are so many creative gallery walls out there! I thought I would create my own (on the largest wall I have in my house).
This is what the wall looked like before:

I started by making a center piece for the wall. A monogram 'C' (with the left over fabric from my headboard).

Got my hot glue gun out and created this:


I placed the 'C' on the wall. ooooo so lonely!!!


And here is a little picture hanging tip I read about. Use this nail to put in the hook on the back of your picture. Place the picture on the wall where you want it to hang, and give it a little tap. It will create a hole for you to place your nail in. Picture Perfect Placement!


I placed on my frames on the floor first so I could create a good balance of small to large frames.
This is how it started.
I made some marks on the wall creating a horizontal 5" line to line up the bottom of my frames. Start a hangin'! 


Slowly but surly, comin' along.


And, here she is. Complete! I added a few of my daughter's art projects to create some interest as well as a few silver canvas pieces I made.


creative. endeavor = completed 

Onward.

Headboard

One of my goals has been to make a headboard. I started simple, and I may upgrade later.
I started with a canvas frame with the dimensions that I wanted, some fabric, and my staple gun. And, I got busy!


I stapled one end all the way down the length of the frame. Then I started on the other side in the middle, stretching the fabric as I moved towards the end.


 After I was done, this is what they looked like on the back.

And from the front:

Then I nailed some frame brackets to the back so I could hang it on the wall.
Not too bad for a $15 head board, hu?? 


creative. endeavor =  completed

Onward.

Accent Chairs


Since I got a new kitchen table  I decided to up-cycle my old table and chairs. So, here are the chairs before:


And after a coat of black spray paint. One, $4 yard of fabric. Quilting batting. and a piece of foam. This is what I got for a few accent chairs. It's always nice to have a few extra spots to sit, right?

I love these simple upgrades!

creative. endeavor = completed 

Onward.


Simple Art

As I was planning out my gallery wall, I decided I needed to make a few extra additions to help keep the balance. I did a quick surf through my sidekick, Pintrest. And, I liked this:


So I decided to create my own!
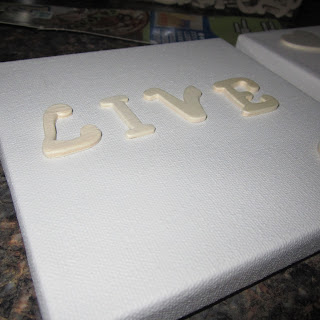
I got some square canvas from Hobby Lobby and some wood letters.
I used a hot glue gun to keep the wood in place. Make sure to draw a light straight line, in pencil, to line up the letters. 


Then, I took them to the garage to spay paint them silver to give my gallery wall some balance, and POP.
Whatta think?


creative. endeavor = completed

Onward.